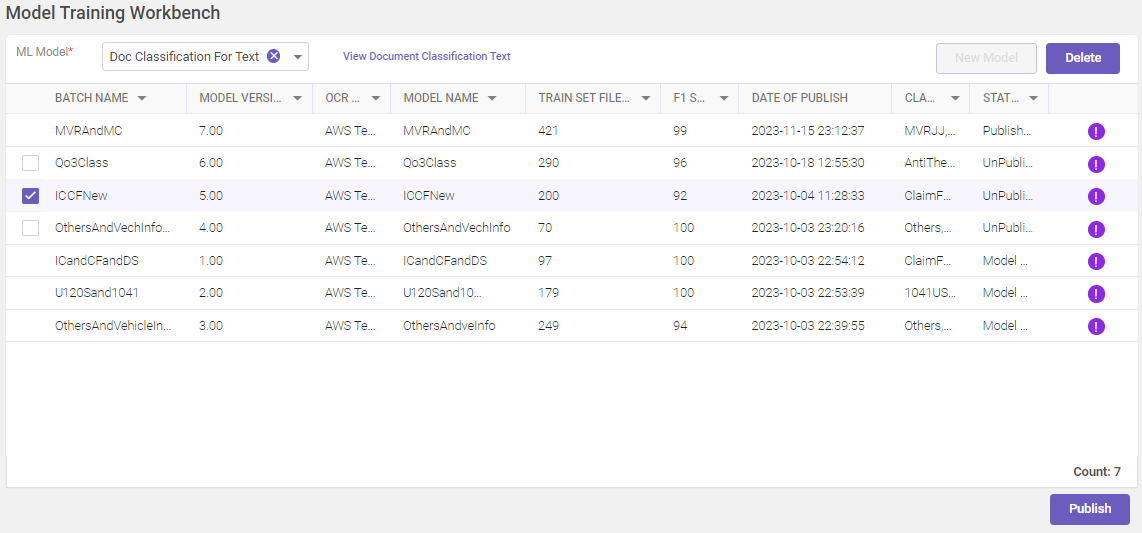
Model Training Workbench
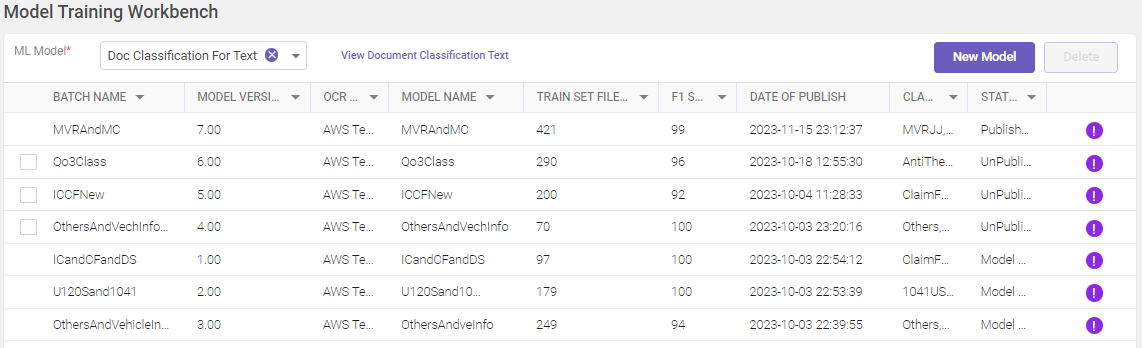
The Model Training Workbench is a centralized dashboard which displays the ML models published and available for training. The Model training workbench module enables you to train and publish models that can auto-populate ontology fields by identifying business keywords and document logos. Keyword and image identification leads to document source identification, and this enables the application to lookup for source specific information in the database. If the information is available, it is used to auto-populate the ontology fields as per the requirements. Auto-populating saves time as it is quicker than the regular OCR-and-rule based extraction and more reliable.
Note
The accuracy and reliability of the models in finding correct data depends upon how well they have been trained.
Accessing model training workbench
To access the Model Training Workbench page, follow these steps:
In the main menu, and under TruCap+ Studio, click Model Training Workbench. The Model Training Workbench page opens.
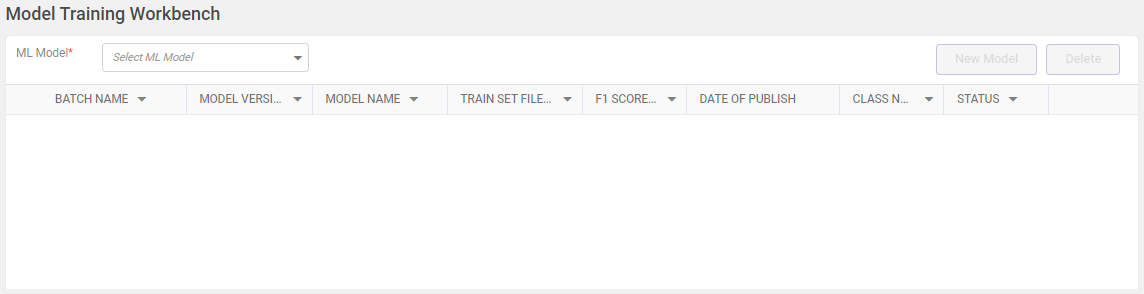
Column header descriptions
|
COLUMN NAME |
DESCRIPTION |
|---|---|
|
Batch Name |
Displays the name of a specific batch. |
|
Model Version |
Displays the version of a given batch. |
|
OCR Engine |
Displays the name of the selected OCR engine for a given batch (This column is visible when you select the Doc Classification for Text ML model from the ML Model drop-down list). |
|
Model Name |
Displays the name of the model. |
|
Train Set File Count |
Displays the number of files used to train a model. |
|
F1 Score/Accuracy |
Displays the accuracy results (in %) based on the test done on the available models. |
|
Date of Publish |
Displays the date when a model was published. |
|
Class Name |
Displays the class name to which the model is associated. |
|
Status |
Displays the current status of the model. |
Note
Click  to display the number of annotations categorized by class, such as SSN, PAN, invoice, etc. A Model Information pop-up provides the percentage and total number of annotation sets (see below image).
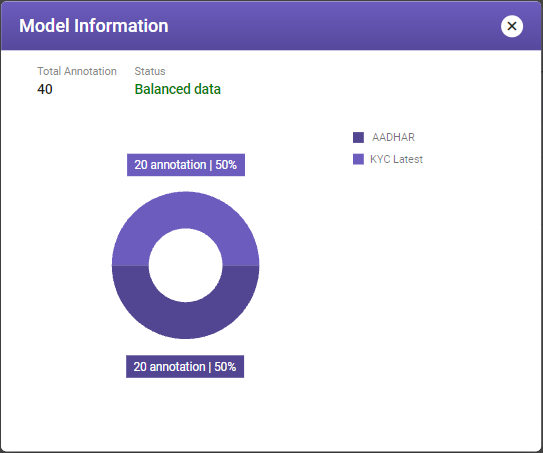
An ideal ML model should have an equal number of annotations in each class for optimal accuracy. If not, then the model is treated as imbalanced. Depending on the accuracy, the status messages such as Balanced data, Low imbalance, and Highly imbalanced for the model are displayed. To know more about the status message, See example: 
In the Model training workbench, you can classify documents based on image and text. The two available methods are:
-
Document classification for image: This method involves training models to classify documents based on their visual content.
-
Document classification for text: Utilize this method to classify documents by analyzing their textual content.
Document classification for image
Document classification for image involves the following steps:
-
Adding a new model.
-
Annotating keyword and training the model.
-
Publishing a model.
Adding a model
You need to have a model (comprising of a batch) for ML model training. To add a model, follow these steps:
-
On the Model training workbench page, select Doc Classification For Image from the ML Model drop-down list for which you want to add a model. The following page opens.

-
On the top-right corner of the page, click New Model. The Model Name window opens.

-
Enter the required model name and click Upload Batch. The Add Batch window opens.


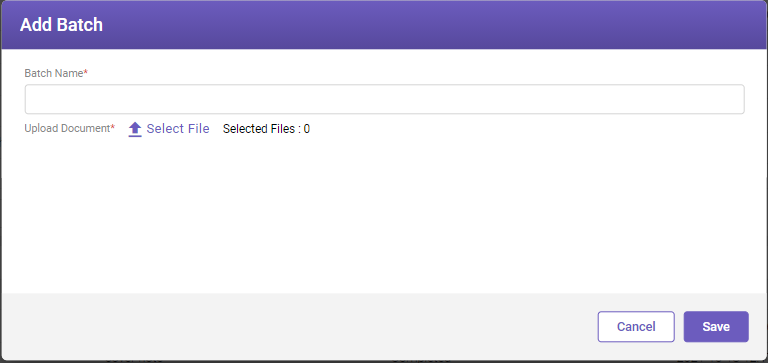
Fill-in the details based on the following field descriptions.
|
FIELD |
DESCRIPTION |
|---|---|
|
Batch Name* |
The name of the batch that is to be created. |
|
Upload Document* |
Click on the Select File link to upload the batch files. |
|
Selected Files |
Displays the total number of selected files for a batch. |
|
Cancel |
To exit without saving any unsaved changes. |
|
Save |
To exit after saving the changes. |
|
* Mandatory fields |
|
A model will be created and appear on the Model training workbench page.
Note
Models can be deleted by selecting them in the Model training workbench page, and then clicking on Delete.
Setting annotation and training the model
Annotating a batch refers to labelling the images identified in a given batch (of documents). After you have annotated the required model, you can train and publish the required model.
To annotate a model, follow these steps:
-
On the Model training workbench page, select Doc classification for image from the ML Model drop-down list. A View Document Classification Image link is visible. Click on the link. The Doc Classification For Image page opens.

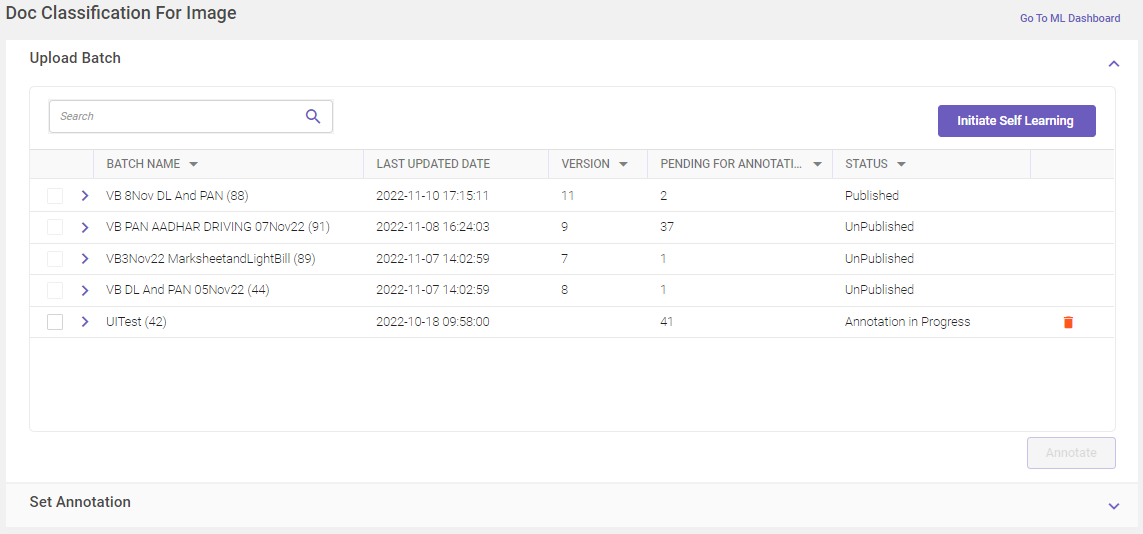
Column header descriptions
|
COLUMN NAME |
DESCRIPTION |
|---|---|
|
Batch Name |
Displays the name of a given batch. |
|
Last Updated Date |
Displays the date on which the batch was last updated. |
|
Version |
Displays the version of a given batch. |
|
Pending for Annotation |
Displays the name of documents pending in a batch for annotation. |
|
Status |
Displays the current status of the batch. |
-
In the Upload Batch panel, select the batch that you want to annotate and click Annotate. The Upload Batch panel collapses and the Set Annotation panel expands.
Note
In case a batch is not required to be included in the model, you can delete it by clicking on the respective  icon.
All the documents in the batch are processed and appear under each other in the panel as shown below.
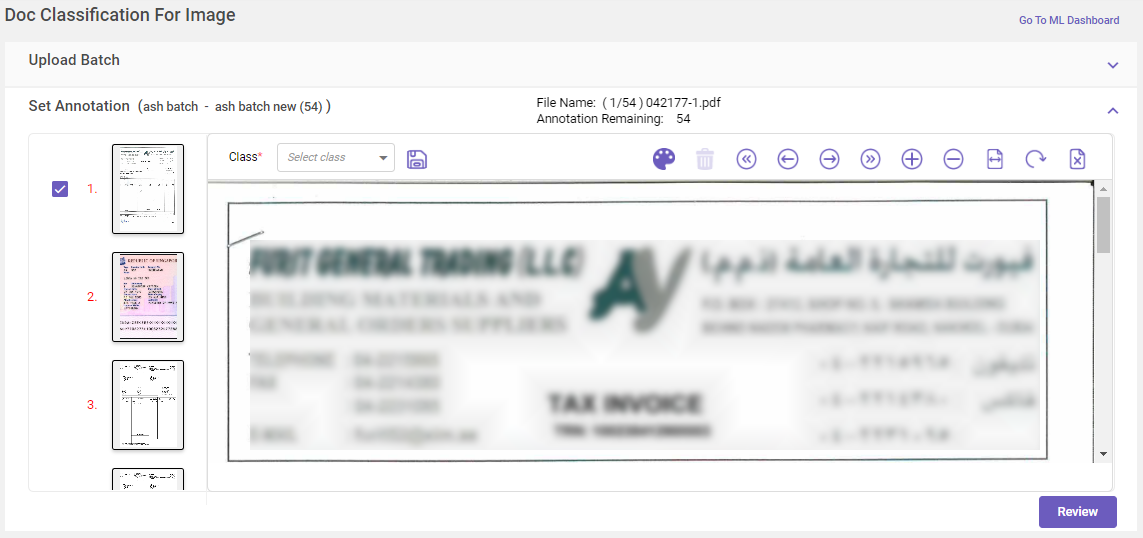
You can use the features available on the taskbar to delete a document, or to navigate the document, or to change the size of the displayed document, or to rotate the document.

Hover-over the above image to know about the available features.
How to annotate
The process of annotating documents for image classification in TruCap+ involves marking regions of interest (ROIs) around specific words or logos within the document. These annotations contribute to training models that accurately classify documents based on their visual content. In document classification for images, each document will be considered as an image.
To annotate a word or to label the identified logos, follow these steps:
-
Click
 to mark ROI around unique words (or group of words) on the document. Select all such words that are unique to the document source such as SSN, PAN, telephone number, etc.
Note:
In case the marked ROI is not required to be annotated, to delete it select the ROI and click
 icon.
-
After marking the relevant word or logo in the document, select a class for that word or logo from the Class drop-down list. If required, you can also create a new category by clicking on Add New Category available in the drop-down list.
Note:
-
For any unexpected documents received for processing whose document type is unrecognisable, then assign Others as the document class by clicking on Add New Category.
-
To create a model, a minimum of 20 annotations is required in a given batch.
-
To save the annotations for a given document, click
 . A success message will briefly appear on the page after annotations are saved.
-
After you have saved the keyword annotations for the required documents in the batch, select Review to review the list of annotated keywords. The Review window will open, in which the annotations and their counts will be displayed.

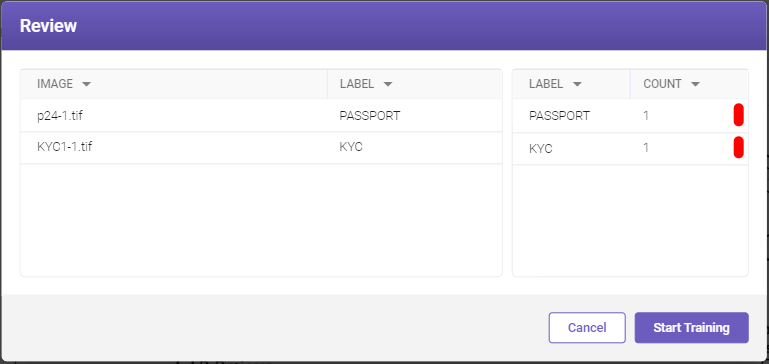
Note:
A label will be flagged by a red mark if the count of words under it are less than 20. For model training, all the selected labels should have 20 or more words under them.
-
To include or exclude specific images or labels in the model, click on the inverted arrow next to the IMAGE or LABEL header. A list of images or labels will be displayed. Select or clear the images or labels that you want to include or exclude from the model, and then click OK.
-
Click Start Training. A message will appear on the screen confirming that the model is being trained. After it is trained, the model will appear under the Model training workbench page ready to get published.
How to self-train a model
The Initiate Self Learning feature in TruCap+ empowers users to engage in self-training for the application. This process utilizes automatically generated data from previously processed documents. By initiating self-learning, you can transform processed documents' data into a self-trained batch. This batch can then be annotated, trained, and ultimately published to improve the model's performance.
To self-train a model, on the top-right corner of the Document Classification for Image page, click Initiate Self Learning.
This action will trigger the self-learning process, enabling the conversion of processed documents' data into a self-trained batch. This batch serves as a foundation for refining the model's capabilities.
Through this straightforward process, you can take advantage of the Initiate Self Learning feature to harness the power of self-training. By utilizing automatically generated data and turning it into a self-trained batch, you can enhance the application's document classification accuracy and overall performance.
Publishing a model
Publishing a model means to make it available to the application for use in processing the documents. Published models are applied for processing one-by-one starting from the earliest version (1.00) available to the latest until one of them provides a result. More
-
To publish the new model, select the model (whose status shows Ready to Publish) and then click Publish. The published model will appear on the model information page.
Note
The Publish button gets enabled only for the models whose training is completed.
Note:
Removing a ML model is a permanent action, and once removed, the model cannot be recovered. If needed in the future, you'll have to either re-publish or re-train the model according to your requirements.
To remove a published model, follow these steps:
-
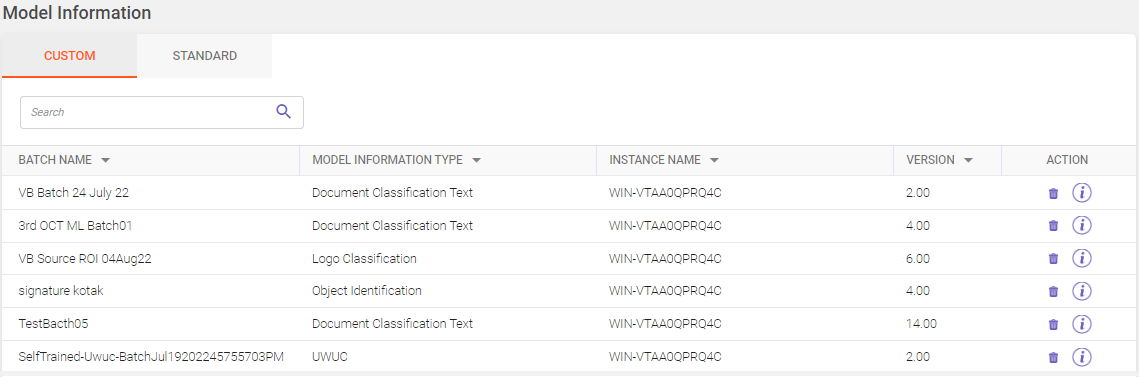
Access the Model Information page. This page provides a comprehensive overview of all the trained ML models available.

-
On the Model Information page, under the Custom tab, identify and find the Doc Classification Image ML model you wish to remove. Utilize the Search field to filter and find specific records within the displayed grid (Refer searching data).
-
Click
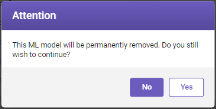
 under Action column corresponding to the Doc Classification Image ML model to remove the ML model. A Attention window opens.
-
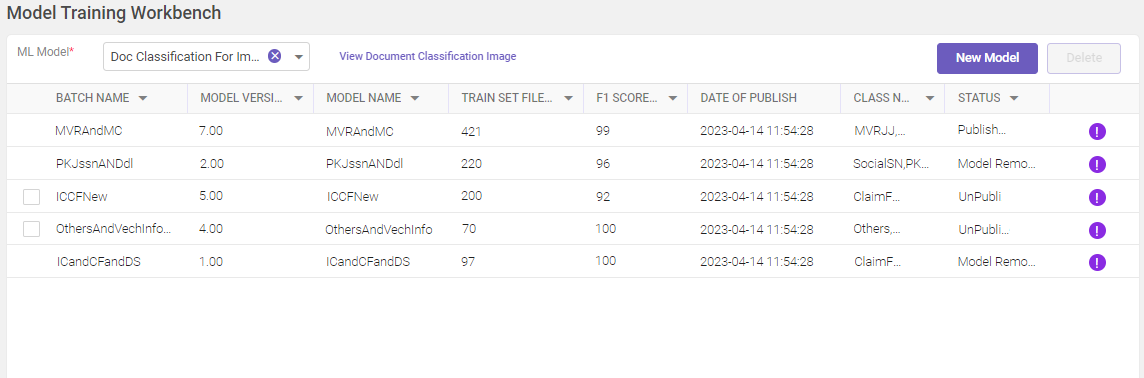
Click Yes to permanently remove the ML model from the list. You can view the removed model on the Model Training Workbench > Doc Classification for Image page.

Re-publishing a model is a crucial step in ensuring that the latest improvements or modifications are reflected in its performance.
Note:
Before initiating the re-publishing process, carefully review the existing details of the model and make any necessary updates to align with your desired changes.
To re-publish a model, follow these steps:
-
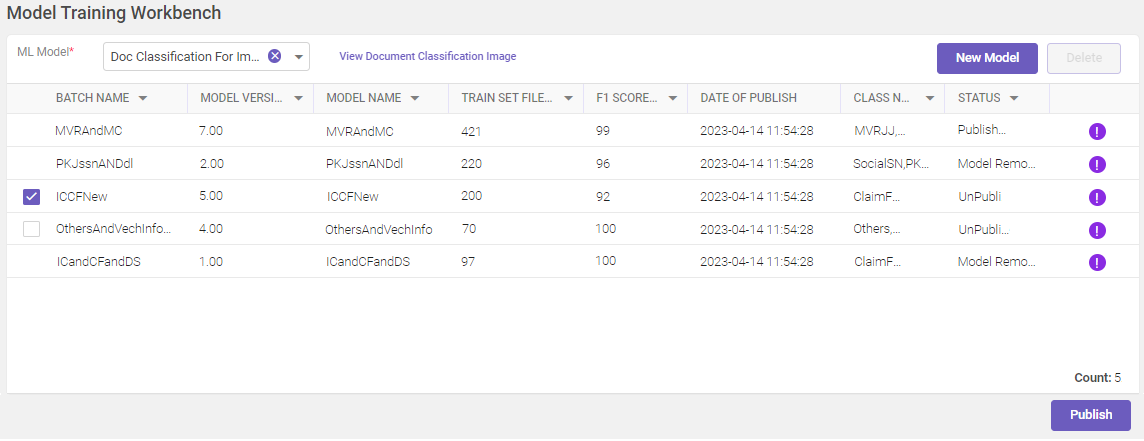
On the Model Training Workbench > Doc Classification for Image page, identify the ML model that you want to re-publish. Models that are not currently published will likely be displayed as UnPublished.
-
Select the unpublished model available in the panel, which you want to re-publish. A Publish button is visible.

-
Click Publish to re-publish the model. Once published, the status of the model changes from UnPublished to Published indicating that the re-publishing process was successful.
You can view the published model on the Model Information page. Take a moment to review the details associated with the re-published model.
Document classification for text
Document classification for text involves the following steps:
-
Adding a new model.
-
Annotating keyword and training the model.
-
Publishing a model.
Adding a model
You need to have a model (comprising of a batch) for ML model training. To add a model, follow these steps:
-
On the Model training workbench page, select Doc Classification For Text from the ML Model drop-down list for which you want to add a model. The following page opens.

-
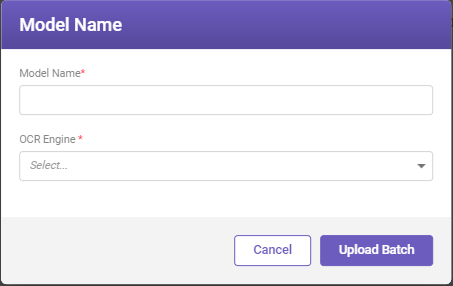
On the top-right corner of the page, click New Model. The Model Name window opens.

-
Enter the required model name and select the required OCR Engine from the drop-down list and click Upload Batch. The Add Batch window opens.
Fill-in the details based on the following field descriptions.
|
FIELD |
DESCRIPTION |
|---|---|
|
Batch Name* |
The name of the batch that is to be created. |
|
Upload Document* |
Click on the Select File link to upload the batch files. |
|
Selected Files |
Displays the total number of selected files for a batch. |
|
Cancel |
To exit without saving any unsaved changes. |
|
Save |
To exit after saving the changes. |
|
* Mandatory fields |
|
A model will be created and appear on the Model training workbench page.
Note
Models can be deleted by selecting them in the Model training workbench page, and then clicking on Delete.
Setting annotation and training the model
Annotating a batch refers to labelling the logos identified in a given batch (of documents). After you have annotated the required model, you can train and publish the required model.
To annotate a model, perform the following steps:
-
On the Model training workbench page, select Doc classification for text from the ML Model drop-down list. A View Document Classification Image link is visible. Click on the link. The Doc Classification For Text page opens.

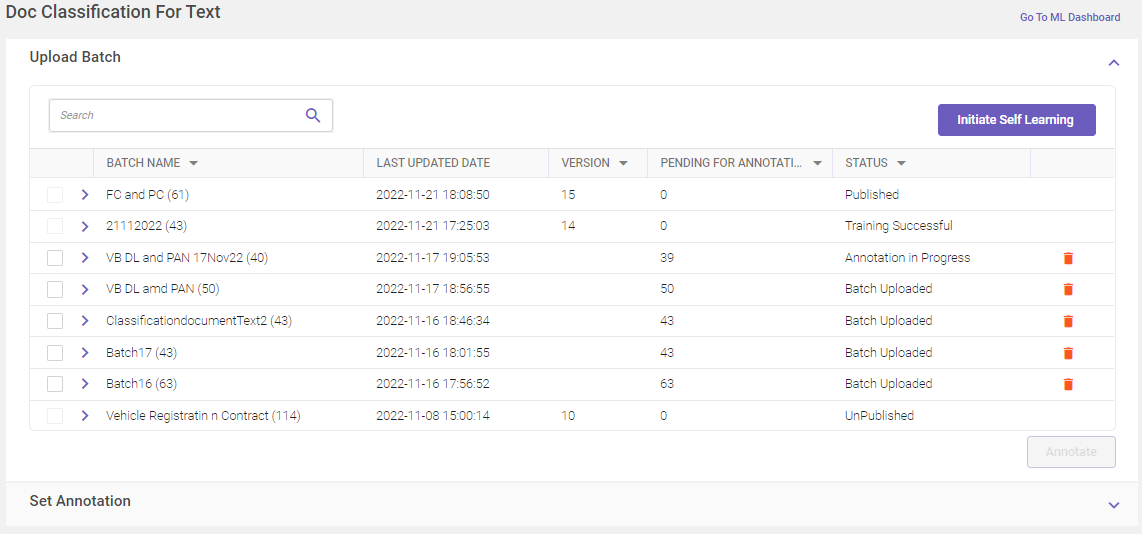
Column header descriptions
|
COLUMN NAME |
DESCRIPTION |
|---|---|
|
Batch Name |
Displays the name of a given batch. |
|
Last Updated Date |
Displays the date on which the batch was last updated. |
|
Version |
Displays the version of a given batch. |
|
Pending for Annotation |
Displays the name of documents pending in a batch for annotation. |
|
Status |
Displays the current status of the batch. |
-
In the Upload Batch panel, select the batch that you want to annotate and click Annotate. The Upload Batch panel collapses and the Set Annotation panel expands.
Note
In case a batch is not required to be included in the model, you can delete it by clicking on the respective icon.
All the documents in the batch are processed and appear under each other in the panel as shown below.
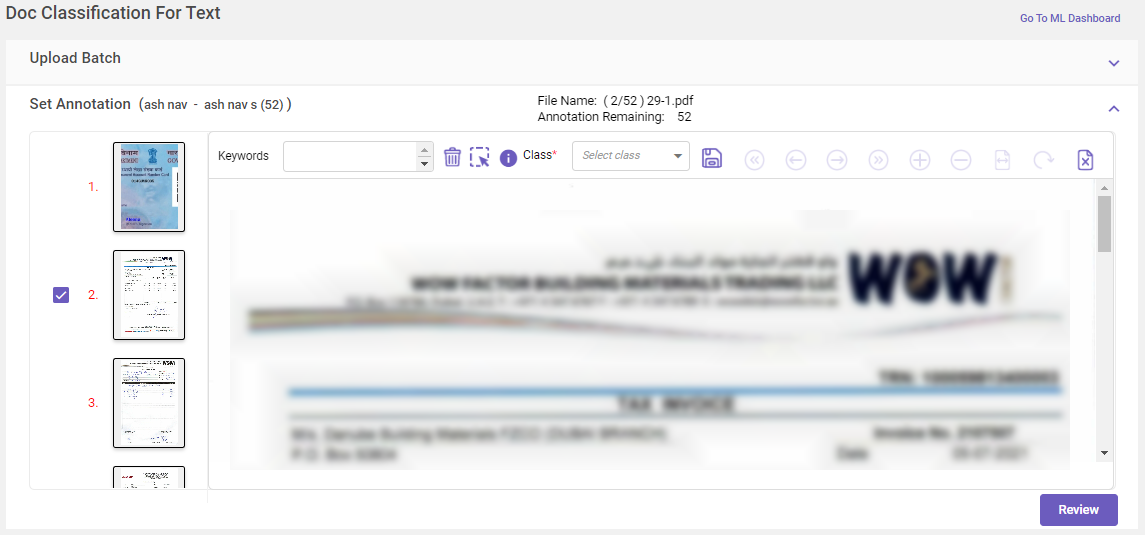
You can use the features available on the taskbar to save a document, or to navigate the document, or to change the size of the displayed document, or to rotate the document.

Hover-over the above image to know about the available features.
How to annotate
To annotate a word or to label the identified logos, perform the following steps.
-
Click
 to mark ROI around unique words. Once you mark the ROI, the word gets added in the keywords field. If the user again clicks on ROI, the selected word gets appended to the previously added word; use the comma ',' to separate the keywords.
A user also can manually enter the unique words (or group of words using comma ',' as a separator) in the keywords field on a single document or multiple documents. Select all such words that are unique to the document source such as SSN, PAN, telephone number, etc.
Note:
In case you want to clear all the text from keyword, click the Clear All
icon. -
After entering the relevant words in the document, select a class for the added words from the Class drop-down list. If required, you can also create a new category by clicking on Add New Category, available in the drop-down list.
Note:
-
For any unexpected documents received for processing whose document type is unrecognisable, then assign Others as the document class by clicking on Add New Category.
-
Special characters such as ! " # $ % & ' ( ) * + - . / : ; < = > ? @ [ \ ] ^ _ ` { | } ~ are also allowed while adding a new category (not applicable for class name).
-
To create a model, a minimum of 20 annotations is required in a given batch.
-
To save the annotations for a given document, click
. A success message will briefly appear on the page after annotations are saved. -
After you have saved the keyword annotations for the required documents in the batch, select Review to review the list of annotated keywords. The Review window will open, in which the annotations and their counts will be displayed.
Note:
A label will be flagged by a red mark if the count of words under it are less than 20. For model training, all the selected labels should have 20 or more words under them.
-
To include or exclude specific images or labels in the model, click on the inverted arrow next to the IMAGE or LABEL header. A list of images or labels will be displayed. Select or clear the images or labels that you want to include or exclude from the model, and then click OK.
-
Click Start Training. A message will appear on the screen confirming that the model is being trained. After it is trained, the model will appear under the Model training workbench page ready to get published.
Self-training the model
The Initiate Self Learning feature in TruCap+ empowers users to engage in self-training for the application. This process utilizes automatically generated data from previously processed documents. By initiating self-learning, you can transform processed documents' data into a self-trained batch. This batch can then be annotated, trained, and ultimately published to improve the model's performance.
To self-train a model, on the top-right corner of the Document Classification for Text page, click Initiate Self Learning.
This action will trigger the self-learning process, enabling the conversion of processed documents' data into a self-trained batch. This batch serves as a foundation for refining the model's capabilities.
Through this straightforward process, you can take advantage of the Initiate Self Learning feature to harness the power of self-training. By utilizing automatically generated data and turning it into a self-trained batch, you can enhance the application's document classification accuracy and overall performance.
Publishing a model
Publishing a model means to make it available to the application for use in processing the documents. Published models are applied for processing one-by-one starting from the earliest version (1.00) available to the latest until one of them provides a result. More
-
To publish the new model, select the model (whose status shows Ready to Publish and then click Publish. The published model will appear on the model information page.
Note
The Publish button gets enabled only for the models whose training is completed.
Note:
Removing a ML model is a permanent action, and once removed, the model cannot be recovered. If needed in the future, you'll have to either re-publish or re-train the model according to your requirements.
To remove a published model, follow these steps:
-
Access the Model Information page. This page provides a comprehensive overview of all the trained ML models available.
-
On the Model Information page, under the Custom tab, identify and find the Doc Classification Text ML model you wish to remove. Utilize the Search field to filter and find specific records within the displayed grid (Refer searching data).
-
Click
under Action column corresponding to the Doc Classification Text ML model to remove the ML model. A Attention window opens.
-
Click Yes to permanently remove the ML model from the list. You can view the removed model on the Model Training Workbench > Doc Classification for Text page.
Re-publishing a model is a crucial step in ensuring that the latest improvements or modifications are reflected in its performance.
Note:
Before initiating the re-publishing process, carefully review the existing details of the model and make any necessary updates to align with your desired changes.
To re-publish a model, follow these steps:
-
On the Model Training Workbench > Doc Classification for Text page, identify the ML model that you want to re-publish. Models that are not currently published will likely be displayed as UnPublished.
-
Select the unpublished model available in the panel, which you want to re-publish. A Publish button is visible.

-
Click Publish to re-publish the model. Once published, the status of the model changes from UnPublished to Published indicating that the re-publishing process was successful.
You can view the published model on the Model Information page. Take a moment to review the details associated with the re-published model.